Sunday 23 June 2013

Dot Net Framework 3.5 Not Installing on Windows 8? Fix it Now!


You may face a common problem while using Windows 8. Microsoft .Net Framework 3.5 is not installed with Windows 8. And several programs may ask you install this. And you can't install this from your PC. It will ask you to connect to the net and use Windows Update. 

By default Windows 8 comes with .Net Framework 4.5 and it doesn't include 3.5. When you try to install .Net 3.5 that you previously downloaded from web the you will see the following message. 


And you will get the same message while installing some some programs that is developed using .Net 3.5 platform. And you will not able to run those programs on your PC! This is a very bad job by Microsoft. A great trouble for Windows 8 users. 

But today you will get the solution. You've install this using command line. I mean you have to use Command Prompt. And surprisingly you Windows 8 DVD includes the .Net Framework 3.5! 


Method 1 (Offline Installation using cmd):
  1. Enter your Windows 8 Installation Disk on DVD Drive.
  2. Now run Command Prompt as Administrator(Hint: Start > Type cmd > Now right click on Command Prompt and hit on Run as Administrator from the bottom)
  3. Now copy the following command and paste it in the command prompt window. Or type the following line in command prompt. Press Enter (To paste the command in command prompt, click the right button of mouse and select paste)
  4. Now .Net Framework will be installed within few minutes. 
DISM /Online /Enable-Feature /FeatureName:NetFx3 /All /LimitAccess /Source:h:\sources\sxs


Remember: h is the drive letter of DVD drive. Change it with your DVD drive letter. 


Method 2 (Online Method using Windows Update): 

If you follow all the instructions of method 1 you will be able to install .net 3.5 properly. But if there is any problem for example- you don't have DVD drive, or your Windows DVD doesn't contain it then you can install it directly from Windows Update option. More or less you've to download 200 MB data from internet. 


Follow the instruction below: 

Control Panel > Programs and Features > Turn Windows Features on or off > Mark the option .NET Framework 3.5 (includes .NET 2.0 and 3.0) > OK. 
Now you will see a window like the image above. Hit on Install This Feature. And make sure you're connected to the net. That's it.  


Secret Tips: If you upgrade to Windows 8 from Windows 7, then you get .Net Framework 3.5 automatically enabled !!


Installing a Windows language pack on Windows 8 before installing the .NET Framework 3.5 will cause the .NET Framework 3.5 installation to fail. Install the .NET Framework 3.5 before installing any Windows language packs.

How to Delete All Emails from Gmail Inbox?


Delete all gmail messages just by one click!


Couple of days ago one of my classmates gave me his email ID and password. Cause there are 12000 email messages in his inbox! What happened actually? He used this email ID to open a Facebook account. And he didn't know how to turn off the Facebook notifications. He also gave me the FB username and password. I turned off the notifications. But what about deleting 12000 mails in the inbox? 


If you have an email ID with FB, Google+ and Twitter account activated then it will take less than 3 years to overload your inbox. So after opening any social account, your first task should be turning off the unnecessary notifications from those accounts.


You can turn off the notifications from the settings option of those sites. You can only allow  notifications which are related to the security of your account. Likes, sharing, following these types of notifications should be disabled if you wanna use your mail properly. Otherwise you will lose important mails among unnecessary mails. 


But if your mail box is already filled up by thousand of unnecessary mails then what? You have to delete these manually. Well the Gmail users shouldn't suffer! 


In this post I'm gonna share how to clean up Gmail Inbox easily. Gmail has a nice system to select all the mails of inbox and clean them just by one click! To do this you've sign in your Gmail account as standard view. Basic HTML view doesn't have that facility. 


Some old browsers (like IE 6 or 7) may not allow you to use Standard View. In that case you've to upgrade your browser. Look at the bottom of your inbox. If you're not using Standard View then you will see a button named Standard View. Hit on that option to activate standard view. And if you doesn't see anything like that then you're already using Standard View. Let's start now: 

  1. Go to your Gmail Inbox. (Standard View)
  2. Just below the search box you will see a selection option. (See the image below)
  3. Hit on Select. Now only 50 emails will be selected from the current page. 
  4. Now you will see a message (See image) All 50 conversations on this page are selected
  5. Just after it - Select all 200 conversations in Inbox
  6. Hit on the Select all to select all mails of your inbox. 
  7. Hit on the Delete button to delete all mails. You're done :) 


How to delete all mails from gmail inbox


Troubleshooting: There is a problem. Select option will select all emails. You can't deselect some of them. But if you've some necessary mails that you don't wanna delete then how you will keep them? 

Very easy. You have to move some emails in different labels by using the move to option. You know Gmail has some labels as personal, travel etc. You can also create new labels. There is an option to create new labels. Do it with the help of image below: 


Move Gmail Conversations from Inbox to Labels

Post Writing Guidelines for Bloggers


Top Tips in Writing Blog Posts!

Well this is not an easy topic to write about. You could never imagine how much responsibility is to be taken when you are discussing about any guideline. Because whatever you write as guidelines/ policies these might be applied by other people. If they get benefited then it's your credit. But if they face any problem by following your principles you should be held responsible for that. 

Anyway, I will try my best to provide you some guidelines which I believe must be considered before publishing a post. These tips will be very useful for you 
  • To increase search ranking
  • To increase visitors 
  • To retain existing visitors
  • Most importantly to improve your writing quality


Read the whole post carefully and participate through your valuable comment . . . :) 

  • Post Title: The first and most important part to the search engines to display your site at the first page. Attractive post title is also helpful to encourage visitors to enter your site. The title shouldn't be unnecessary long. And you must try to keep it as meaningful as possible. 
  • Post URL: You can create custom URL/ link for a post. Both blogger and WordPress let your customize the post URL. It is not only important to the search engines but also to the visitors of your site.
  • Contents: The most important things to keep your visitors in touch! Your contents should be attractive and useful. Information provided must be accurate. Contents should be written in a clear and easy language. Try to make your contents unique and exclusive. But if you're not able to create unique contents never try to copy and paste from others. This is strictly prohibited by Google. When you write the contents from other website first you have to take permission and then you should refer to that site. 
  • Labels/ Tags/ Keywords: Labeling is also very important. Proper labeling helps the visitors to find the right post within your site. And definitely the labels have a great impact in search results. So you should carefully use labels/ keywords in the posts. But never try to use the irrelevant labels or tags in your posts. If you do so, you could be blacklisted both by the visitors and search engines! Be Careful! 
  • Formatting: Very very important. Make the texts bold, italicize or underline them when and where necessary. Also use different fonts to highlight some parts. Use numbers and bullets when giving a list of something. Use quoted text where applicable. You should keep sufficient space between paragraphs. Never type the whole post in a single para. It makes the reader bore and uneasy. 
  • Search Description: This is a lovely feature of blogger. Usually the first few sentences of a post are shown by search engines in search results. WordPress automatically do this for the users. But if you're the user of blogger blog, then you have to do this manually. This could be boring for you. But this feature lets you customize the search description. Because the first few sentences may not be relevant to your post or may not able to attract visitors. Read more about search description
  • Post Length: What is the optimum length for a post? Actually there is no rigid rule. Post should be descriptive enough so that it clarifies your message to the readers. But it doesn't mean that you will make your post unnecessary long. It should be precise, accurate and clear. Most of the bloggers try to write more than 500 words. You can also practice this rule. Because the more you write, the higher is the chance to be matched with the search queries of the visitors. 
  • Language: Your language should be friendly and attractive so that the visitors feel free to read the contents. It should be easy and meaningful. Never try to be over smart in using the language style. 
  • Grammar: Well 100% accurate grammar is not important for you unless you're writing something about language or grammar. But it doesn't mean that you will not care about grammatical accuracy. You should be careful enough to avoid mistakes. If the visitors find too much grammatical errors they may feel bore and lose interest to your site! 
  • Color, Text Alignment, Text Size, Font: These issues are crucial to look your posts attractive and readable. Use of color is okay but only when it's necessary. Black is the best. But when necessary, you can use any color. Text alignment should be justified but when required you can use left, center or right too. Font size shouldn't be too large or too small. It should be readable. Use large text when necessary. You can use any font. But always avoid stylish fonts (ie. Monotype Corshiva, Vivaldi, Vladimir) in normal text. I mean use a font that is easy to read and understand. My personal choice Georgia. 
  • Image: A single image might be worth of thousand words. So you should use relevant image with your post (never copy from others). In case of using image you should consider some factors. Image placement should be proper. Make sure it doesn't looks odd and hinders the visitors to read properly. Image should be attractive and creative. Use the post link with the image. Give it a proper title text and alt text. Avoid extra large size images. Because they consumes data and increase your site's loading time
  • Outbound Links: You can also use reference links with your post which may be helpful for the visitors to know more. And this is also important to Google. But never share too much links with the post. 

If you follow these rules I think you will be a good writer for sure. And your site will get more visitors and higher ranking soon. Along with these rules you must ensure that your site loads faster. Visitors never like a slow site. Site's design should be attractive. Never place too much social sharing buttons on your site. Be careful while placing Ads on your site


You should also follow my style. I think my posts are properly designed. If you think something is wrong then please inform me. Waiting for your feedback . . . :) 

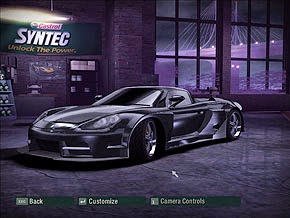
NFS Carbon Cheat Codes & Trainer!


Racers like to play NFS games. Because NFS is great for racing game. NFS has many attracting games like Hot Pursuit, Most Wanted, Carbon, Underground etc. 

Cheat codes don't let you enjoy the full excitement. But even in some difficult situations you have nothing to do. Some levels or races are really difficult to overcome. In that situation, you can take help of Cheat Codes.

In this post I am providing you a trainer that works for NFS Carbon (Ver 1.2, 1.3, 1.2 collector and 1.3 collector). First download the following file and read the instructions properly.

  1. Download the .zip file from the above link and extract it.
  2. Then read the read me file carefully. 
Before playing the game you must run the trainer from the downloaded file. Run as administrator in Windows 7 and 8. Then load the game. When you activate a cheat, you will hear a voice Cheat Activated. When you press the same cheat button you will hear Cheat Deactivated. This trainer has been collected from cheatpappens.com

Activate Windows 8 Just by Double Click (All Versions) !!!


Windows New PNG Logo


Couple of weeks ago the final version of Windows 8 has been launched by Microsoft. Versions are- 
  • Windows 8
  • Windows 8 Pro
  • Windows 8 Enterprise
These are the main versions which have other segments too. ie. Pro N, Pro VL, Enterprise N, Enterprise VL etc. 

If you've any trouble to activate Windows 8 you can solve it just by double click. Have any doubt? Try it now! 

Whatever the version of your Windows 8, a single activator can activate any all versions. Follow the steps below:
  1. Download the zipped file from the link below.
  2. Now extract the file. (It can also work in zipped condition)
  3. Then double click on the file Windows 8 Activator.exe. 
  4. Now within 2/3 seconds your PC will be restarted.
  5. After restarting you will get some message about activation. Hit OK button in the all boxes that appear. 
  6. Enjoy the benefit of full version. 

Download Link


If you can successfully perform this task, then your Windows activation status will be as image shows below:


Most of the people found this activator working. If this doesn't work for you, then try the following one: 

Windows 8 Activator for All Editions (Guaranteed) !!!


I think at least one of them must work for you.

Office 2010 Activator (KMS) !!


Day by day cracking is being a tough job. But yet very possible. Earlier a software may require a simple serial key to activate. But today there are many other options. Sometimes you might be asked to connect to the internet to activate or sometimes you're asked to make a phone call! 

Microsoft Office 2010 has the same problem. It is not simply activated by the CD key. Sometimes CD key may not be asked during the installation process. If you're required to enter serial then try any of the following: 

YF79C-7Y4B4-PGM89-6BKGJ-46PBT
FC7HF-CF42G-MX6D7-8K9T7-BT9QT
2PWHY-KT4X6-96PYW-XQR7V-HW2W9
PYMDW-8DFY2-Y68BB-XHDGD-CT443
7XD2X-JWJ94-BCHBW-W9WXP-J2WPT
P6RW8-B8X84-FFK73-4BPWM-KRHX3


After installing a trial version of Office 2010 you're allowed to use it for 30 days only. After that it will ruin your peace. It will give you continuous love messages each time you start office. Today I'm gonna share an activator by which you can activate Office 2010 and stop unwanted love messages by MS Office 2010! 
  1. First download the zipped folder from here. It's just 1 MB. 
  2. Unzip it. 
  3. Now hit on the activator. (Disconnect net and close all running office programs) 
  4. Choose Activate Office 2010.
  5. Here you will see a command prompt window. You may ask to type 1 through 3. Type 1 or 2 to start the process and wait for 1 or 2 minutes. 
  6. Then press any key to exit. 
Office 2010 Activator


This KMService will activate Office 2010 for 180 days or 6 months. After finishing this time period run the same process. 

In case if it is failed to activate the office then choose Rearm Office 2010 option. It will activate Office for 30 days. 

Resize Image by Free Image Converter


large to small circle


Sometimes you may need to re size high quality images. Maybe you captured some photos by high quality digital camera. Most of the cases a photo maybe over 3 MB in size! 

If a single image is more than 3 MB in size and you have to send 30 images to someone by email then it maybe more than 90 MB. If your net connection is very poor or bandwidth is very limited then can you send these images to that person? 

What do you do in that case? Looking for a good network or not send at all? 

Well this problem has a very good solution. A 3 MB size photo maybe ideal for printing purpose. But only for viewing purpose it is not necessary to be more than 100 KB! And after re-sizing the image your 90 MB image folder will be less than 3 MB!!!


Let's discuss how to re-size the high quality image. 

Follow the instructions below: 
  1. Download the Free Image Converter from this link. Free means free. It has no premium version yet. 100% free of cost. 
  2. Now install this on your PC. It supports all running versions of Windows i.e. XP, Vista, 7 and 8. 
  3. After installing you should find an icon of the image converter on your desktop. Double click on it to open. 
  4. Click on the Add Images button to select few images. Or choose Add Folder option to choose a large image folder. 
  5. Now have a look at the right panel- simple options. Select size and quality. Or keep it in default settings- size 800 * 60 and quality 70. 
  6. Then hit on the Simple Convert. 
  7. Now a new window will ask you to choose a location to store the converted images. Choose a specific folder or create a new one. Done! Just wait for the operation to be finished! 
Note: I've personally tested this software. I've converted my 1 GB photo folder. There were more than 400 photos. After converting the size it was just 20 MB! And it took less than 5 minutes! Quality was also satisfactory. 

Cut Large Audio Audio File: MP3, WAV, WMA, MP2


How to Cut or Split Audio Files


My today's discussion is very common but still I think it will be really useful for you. Today I'm gonna talk about how to cut or split an audio file. 

Those who already know this tips may think this is very simple. I also know this is a simple trick. But who can't do this, know how useful and necessary this is. I will show you this tutorial using Data Doctor Audio Splitter. 

Data Doctor Audio Splitter is a nice, small and handy tool for cutting audio files. When you wanna cut a song or music to make ringtone, or if you wanna cut a large files that contains more than 1 song this tool will be really useful.  


Features: 
  • Portable 
  • 100% free !
  • Fast and Reliable
  • Simple and easy to use interface
  • Supported Files: MP3, WAV, WMA and MP2

Instructions:
  1. Download the file from the link below and unzip it. Download size will be 600 KB.
  2. Click twice on Data Doctor Audio Splitter.exe
  3. Choose your desired audio song hitting on the Browse button located at the right side.
  4. Now play the song and wait for the desired position where you wanna set your start point. Then click on the Start button to set start point.
  5. When you wanna finish the song click on the End button to set finish point. You can alsopreview the song before splitting. 
  6. Finally hit on the Split button and give it a name and set a location for it. 
  7. Hit OK. That's all! 


Cut audio and make ring tone!

Saturday 22 June 2013

Join Audio Files and Convert it to a Single File!


MP3 Joiner


In my very last post, you learned how to cut an audio file. Today you're gonna learn the opposite thing! Today I'm gonna write about how to join some audio files to convert them into a single file. 

You may like a song very much. But you may dislike the few parts of the same song. What do you do then? Split the song as you like and listen to them separately? You may do so but this is really uncomfortable. 

Better you join the files into a single file. There are many programs to join the audio. For your convenience I will use Shuangs Audio Joiner. It has following advantages: 
  • Portable (No installation required)
  • Easy and friendly interface
  • Free or charge
  • Compatible with all running version of Windows
  • Options to control the output file format and size
There is a single problem that is very irritating is that it is little bit slower. However as a free tool  I think this is very handy. 

So we can start our tutorial. Follow the simple instruction below:   
  1. Download the zipped file from the link below. It's 1.3 MB in size. 
  2. Unzip the folder and keep it in a safe location on your Hard Drive. 
  3. Open the folder and hit on AudioJoiner.exe (You can also create a shortcut of it on your desktop). 
  4. Hit on Add button > Find and select your audio files > Click on Join button > ChooseOutput Format > Next > Choose Bitrate (Select 128 or less to save time) > Next > Select Destination > Give a Name > Hit on Join
  5. Now wait for the mission to be finished. That's it. 
mp3 joiner


Self Assessment Test by Brain Works !!


Self Assessment Test to evaluate brain usage


Today I'm gonna talk about something different. It can be compared to a psychological test. If you take this test you will be able to know which part of your brain works more than other parts. How you respond to new situations or experiences. 

This test will also help you to realize what will be the effective learning system for yourself. It will show you how you use the parts of your brain and by what percentage. 

This self assessment test is prepared by Synergistic Incorporation Ltd. 
  1. Download the zipped file from the link below and unzip it. 
  2. Click twice on Brain.exe file.
  3. Now you will see the Welcome Screen. Click anywhere or press any key to continue.
  4. Enter Your Name and press Enter.
  5. Read the Introduction message if you want or press any key to continue.
  6. Another message may appear. Read this or skip. Reading will increase your understanding of this software. 
  7. Now you've to answer 20 questions. Answer all the questions. You can use mouse or press A, B or C to answer a question. (Remember: There is no right or wrong answer)
  8. When you finish you will see an image of your brain usage. Focus on your percentage of Auditory, Visual, Left and Right brain usage. 
  9. Then hit on Personal Evaluation and read the full report about your brain. That's it. 

Note: When you run this application on your PC you can't close it, or go to the desktop. To close this program press Alt + F4. And simply press Start + D to go to the Desktop


Download Flash Game: Flamingo Drive for Free !!!


Yet in Africa Flamingo Drive Screen Shots


Gamers love to play large games like GTA, NFS, IGI. But still few of you may like to play Flash Games like me. Though I love to play Racing, Action or Cricket but still I've a great attraction to small Flash Games. Today I'm gonna share such a game with you. It is named as Yet in Africa- Flamingo Drive. You can download this for free! 

This game is very small in size. You've download a zipped file which is less than 2 MB. It is a flash game. You've to operate it by mouse. 

  1. Download the zipped file from the link below and unzip it. 
  2. Now click twice on Flamingo Drive to run the game.
  3. Just at the right bottom corner you will see the Play button. Hit this 4 times.
  4. Now you're ready to play.
  5. You've 5 chance available to hit. 
  6. In each chance you've to click twice. The first click will set your direction. And the second one will set your power. 
  7. You can also see the preview just at the bottom of the game. 
  8. Play n Enjoy! 


Copyright @ 2013 Mandeep Cool.

Designed by Templateism | Mandeep